Response Set Tab: Nominal-Pick One
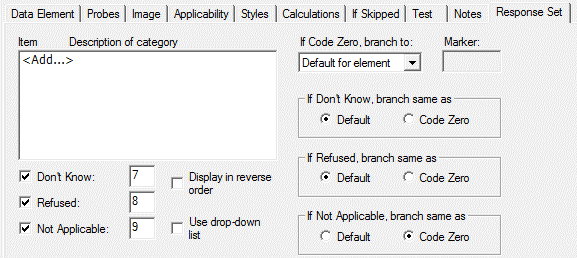
Use the Nominal-Pick One response type for Data Elements that require the selection of a single response from a predefined set of categories. There is no category limit; however more than 24 categories will be displayed as a drop-down list rather than buttons in the CAPI and ACASI modules; see Entering Response Data in CAPI/ACASI: Pick One Type Responses. You may set up Pick One Response Cards for sets of responses that will be repeated for multiple questions.

Pick One Response Options
- Special Codes: Indicate whether Don’t Know, Refused, and/or Not Applicable are allowable responses for this item. The default setting is checked. You can modify the default values for these categories (see QDS Special Codes).
- Display in Reverse Order: Check this box if you would like the categories to be displayed in reverse numerical order. If the box is unchecked, the categories will be displayed in numerical order, lowest to highest.
- Use drop-down list: Check this box if you would like the choices presented in a drop-down list rather than buttons. If the response set includes more than 24 choices, this will be automatically checked and responses will be presented in a drop-down list in CAPI and ACASI (Not available for QDS-Web).
- Branching: The If code Zero, Branch to option specifies the next element to be processed if the response to this question is the category with code value Zero. Select Default for element to branch as specified for this Element on the Data Element tab. To skip over a specified number of elements when the response is Zero, select Skip <#> Elements. To branch to a specified Marker Element after a Zero response, select Marker... and enter the Marker ID in the box to the right. For special code responses (Don’t Know, Refused, and Not Applicable) you can specify if you wish these to follow the same branching as the default or Zero response by selecting the appropriate radio button. These options are only enabled when the corresponding special code is enabled.
Tip: It is always better to use Skip Elements instead of the branching option. They are more flexible and are displayed in the element listing, making review and testing easier.
Entering Pick One Categories
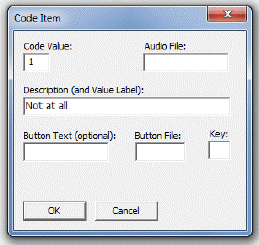
Under Item, Description of category, select <Add> to enter categories for the current Data Element.
- Code Value: Enter a unique numeric value (By default, QDS will assign 0 to the first category and increment by one for each additional category).
- Audio File: Enter the filename (minus the .WAV file extension) for the WAV file that corresponds to this response category (see Using Recorded Audio). This is optional and is applicable only for ACASI interviews.
- Description: Enter description of the category; this will also provide value labels in data exported from the Warehouse manager. Labels are truncated when data is exported if the entered length is longer than allowed by the export program type:
- SPSS 17- 120 characters (Chinese, Japanese, and Korean: 60 characters)
- SPSS 6 - 60 characters (Chinese, Japanese, and Korean: 30 characters)
- Stata - Unlimited
- SAS XML format - Unlimited
- SAS Transport - 255 characters (Chinese, Japanese, and Korean: 127 characters)
- Access, Relational database - 255 characters
- Button Text: Enter button text for automated interviews (optional). If this box is left blank, the text entered for the Description will be used. (See About Bitmap Buttons.)
- Button File: Enter the name of the bitmap file to be used for automated interviews (CAPI, ACASI). Leave this box blank to use a text button that displays the Button Text.
- Key: For an automated interview (CAPI, ACASI), you may assign a key to be used to select the code button category. This is comparable to the Yes/No Response Type option where pressing Y or N selects Yes or No for automated interviews. This option is applicable only when Bitmap buttons are used. (Text buttons will automatically assign and display shortcut letters based on the entire response set – i.e., the first code will be A, the second B, C, etc.).
Click OK when you have entered all information for the category. Continue adding Pick One responses until your list is complete. You may revise and edit this list at any time.
