Adding Multiple Local Data Files
If you have multiple CAPI, ACASI, or DE data files, you can add these all simultaneously to your Local Warehouse file with the Transfer Multiple Data Files function. This combines the File|Open and Edit|Copy to Warehouse commands into a single step. This function is recommended for data collected using the CAPI or ACASI build option Generate unique data file for each interview, where each interview is stored in a unique file with the format: <control-file-name> <identifier variables> <date> <time>.QAD.
To add multiple *.QAD, *.QPD, or *.QED data files at once to the Local Warehouse, go to File|Transfer Multiple Data Files. There are two options: (1) Select Files (keyboard shortcut Ctrl+M) or (2) Select Folder (keyboard shortcut Ctrl+R).

Select Files to Transfer
- Go to File|Transfer Multiple Data Files, Select Files, use the shortcut Ctrl-M, or the
 menu icon.
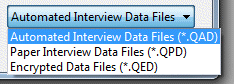
 - In the Transfer Files dialog box select your file type from the drop down box.
- Check the Replace all duplicates option box if you would like QDS to replace duplicate interviews without prompting.
- Select the interview files you would like to add from the list files box. You may highlight multiple filenames at once using the ctrl or shift keys and the arrow keys.
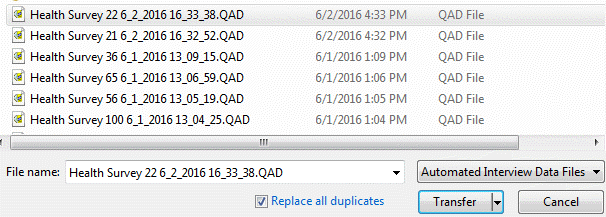
- Select the Transfer button; QDS opens each file and copies all interviews within that file to the Local Warehouse window. The status of each copied interview is automatically changed to Transferred within the source data file.
- QDS will display a message regarding the number of interviews transferred. An unlimited number of files can be added at one time.

Select Folder to Transfer
For the option Select Folder, you can add all QDS data files (*.QAD, *.QPD, and *.QED) that reside in a single folder to your Local Warehouse simultaneously. This feature only adds data from the selected folder, not any sub-folders.
- Go to File|Transfer Multiple Data Files, Select Folder, use the shortcut Ctrl-R, or the
 menu icon.
 - Select the folder that contains the QDS data files you would like to add.

- Check the Replace all duplicates option box if you would like QDS to replace duplicate interviews without prompting.
- Select the Transfer button.
- QDS will add all QDS data files (*.QAD, *.QPD, and *.QED) that reside in that folder to the Local Warehouse file. The status of each copied interview is automatically changed to Transferred within the source data file.
- QDS will display a message regarding the number of interviews transferred. An unlimited number of files can be added at one time.
Security
For both methods, if the any of the data file(s) are Read password encrypted, the Warehouse Manager prompts for the password. It will only do this when encountering the specific survey version for the first time. For data collected with Key Exchange encryption, each interview is stored in a separate .QED file that includes the date and time stamp in the filename so adding multiple data files at one time is especially useful. Once key encrypted (.QED) data files have been added, they are renamed with a .QAD extension.