CAPI: Colors
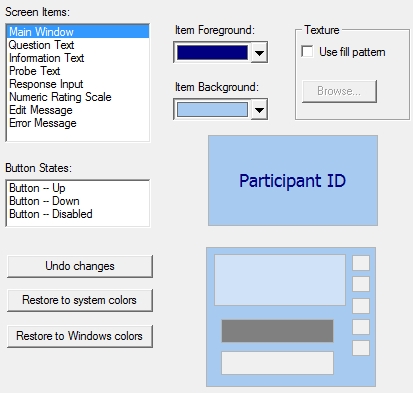
Under Options|Build, CAPI, Colors you can customize colors for your interview, including all screen items and buttons, as well as select a background image for the Main Window.
You can modify the colors for Main Window, Question Text, and Information Text during the course of the interview under Format Elements, Colors tab. Format Element settings override Build settings.
Tip: Go to Options|Save to User Options to save your settings to a User Options file that can be applied to other design specifications files (*.QDS).
You can set the Item Foreground and Item Background color for all the items listed in the Screen Items box, as well as the different button states. Note that the preview boxes will show how your new color scheme will look in the interview.
Setting Screen Item Colors
To change the color scheme for a screen item type:
- Select the category(ies) to be changed in the Screen Item box. You can select each screen item one at a time or you can highlight a group of items in the list box by pressing the Shift and arrow key; changes will affect all item types highlighted.
- Select your new color choices in the Item Foreground, Item Background, or Texture boxes (see Choosing Colors)
- View your change in the preview boxes
- Repeat for additional screen item types
- Click OK when finished
For example, if you change the Main Window and Question Text colors from their defaults to foreground=Dark Blue and background=Pale Blue, the preview boxes will update accordingly (see above). Item foreground colors apply to text or characters and item background colors apply to the surrounding box area for that given screen item type.
Tip: The Main Window background can also be changed to a texture using an image file (see Choosing Textures).
Screen items that can be changed include:
- Main Window
- Question Text
- Information Text
- Probe Text
- Response Input
- Numeric Rating Scale
- Edit Message
- Error Message
Dialog boxes that are only used by research staff, such as the comments box or the password dialog boxes will still default to Windows system colors.
Button States (Changing Button colors)
To change colors for buttons, you will change the three button states: Up, Down, and Disabled separately.
- Select the state to be changed in the Button States box
- Select your new color choices in the Item Foreground and Item Background boxes
- View your change in the preview boxes
- Repeat for additional button state types
- Click OK when finished
Undo Changes
To undo the last set of color and/or texture changes, select the Undo Changes button.
Restore to System Defaults
Select the Restore to System Defaults button to change colors and texture to the current QDS system colors as displayed under Options|Product Options, CAPI/ACASI tab.
Restore to Windows colors
Select the Restore to Windows colors button to change to the current Windows settings.